How to Image a Failing Drive Safely
Plan the acquisition before touching the drive: confirm the source, the destination, the address space and the stop conditions first. Capture what is easily readable, keep a coherent record of what was read and what wasn't, and treat new mechanical symptoms or destination errors as a reason to stop and review — not as a reason to retry harder.
- Run a preflight check first: source, destination, address range, units and stop conditions.
- Capture easily readable ranges first, review coverage, then return selectively to the gaps.
- Record the map and log as carefully as the data; a resume needs the same output and map pair.
- Unreadable ranges, genuine zeros and sparse holes are different facts in the result.
- New mechanical symptoms or destination errors are stop conditions, not reasons to retry.
A preflight checklist, before any read starts
Before the first read, confirm the following:
- The source is correctly identified.
- The intended target address range is verified against the device's own reported geometry, not assumed.
- Units and offsets are consistent throughout (bytes vs. sectors, and the sector size actually in use).
- The destination has enough space for the full logical length.
- The output is not located on the source.
- No step will auto-repair or auto-mount the source in a way that writes to it.
- The access path (direct, through a bridge, or through specialized hardware) is the safest one available.
- The map and log location is decided and recorded.
- The interrupt-and-resume procedure is understood before it is needed.
- Recovery priorities for this case are known.
- Planned stop conditions are written down, described by scope — which ranges, which symptoms — rather than by the bare word "read-only," which by itself does not describe what is actually being limited.
A simple plan: capture, review, return, close
At a high level, the plan stays short: capture the easy, readable ranges first; review coverage and how the device is behaving; make a selective return to specific remaining gaps only where that's actually justified; then stop, close and hand the result over. A new mechanical symptom is a reason to stop reading altogether, not just a reason to set the "hard" sectors aside for later.
What to record while the acquisition runs
During the run, what gets recorded matters as much as what gets read. The table below separates observations that call for a simple note from ones that call for stopping to reassess, and it keeps destination problems apart from source problems — a failure writing to the output drive is not evidence that the source sector is bad.
Scroll horizontally to see the full table →
| Observation | What to record | Next decision | Limit |
|---|---|---|---|
| Easy reads with localized gaps | Coverage so far; location of the gaps | Continue the planned pass | None yet — this is the expected shape of a first pass |
| No new successful reads for a while | Elapsed time since the last successful read in this region | Consider moving to a different region or pass strategy | Qualitative, not a fixed retry count or numeric speed threshold |
| Repeated reconnect or reset | Exact device identifiers before and after each event | Pause; confirm the device is still the same source before resuming | Never resume by assuming device order stayed the same |
| New mechanical symptoms | What changed, and when | Stop; move to assessment, not more retries | Continued reads can worsen the condition |
| Output full or write errors | Which destination, which operation failed | Fix the destination before resuming — this is not a source problem | A full or faulting destination can look like a stalled acquisition |
| Changed reported capacity | Before/after capacity and identifiers | Stop; treat as a possible different device or access-path issue | Do not keep reading against an unexplained capacity change |
| Recovered metadata pointing to high-value extents | Which extents, from which source | May justify a prioritized pass over those ranges | A supported option, not a required first step |
Stages, kept evidence and what not to infer
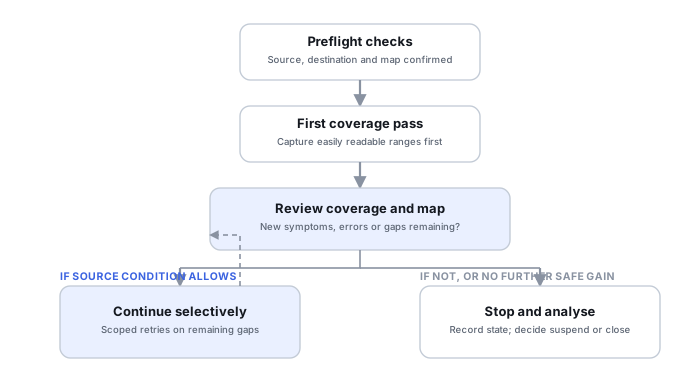
The diagram below shows the acquisition as a loop, not a one-way ladder: after preflight and a first coverage pass, review the coverage and the map before deciding whether to continue selectively or stop and analyse. Continuing loops back into another review rather than running unattended until finished.
Scroll horizontally to see the full diagram →
The table below pairs each stage with the evidence it leaves behind, and with a conclusion that evidence does not support on its own.
Scroll horizontally to see the full table →
| Stage | Intended result | Kept evidence | What not to infer |
|---|---|---|---|
| Preflight | A verified plan before any read | Checklist record, identifiers, planned scope | That the plan guarantees a particular outcome |
| First coverage pass | Easy regions captured while the device still responds | Partial image plus a map of what was and wasn't read | That remaining gaps are unrecoverable |
| Selective return | Targeted re-reads of specific remaining gaps | Updated map reflecting the new attempts | That the map's "read" entries say anything about current correctness at a higher layer, such as a RAID generation |
| Suspended job | A safe pause point, not a failure | The output and map as they existed at the pause, kept together | That the last status shown on screen before an interruption is durable — only the saved, coherent pair is |
| Closed acquisition | A final, coherent output/map pair for this generation | Closed image, final map, and a short record of what was done | That "map says read" by itself proves semantic correctness of the data at the file-system or application level |
Resuming correctly means keeping a coherent pair
A resume only makes sense against the same output and the same map it left off from. Transplanting a map onto a blank or newly created image produces a record that looks complete while describing a different file — the map and the output it describes must stay paired as one version.
Unreadable ranges are not the same as zero-fill
Not every acquisition gap is filled with visible zeros, and a range that does contain zeros is not necessarily a hole left by the tool — it can be a genuinely read zero, a sparse-file hole in the destination representation, or a substituted placeholder, and these have different provenance. What a range actually represents is defined by the map, not by what pattern happens to be visible in it. Exact substitution and padding behavior for unread ranges is tool- and version-specific; confirm it against the acquisition tool's own documentation for the version in use rather than assuming one universal convention.
What a read timeout actually limits
Timeout settings act at different layers. GNU ddrescue's --timeout (see the author's ddrescue manpage) limits the time since the last successful read; it is not a deadline for each individual device command, and not direct control over drive firmware behavior. Other tools may expose command-level limits or reset controls instead, so the meaning has to be checked for the particular tool and access path. Treat any specific numeric value as scoped to the device and tool it was chosen for; this page does not recommend a universal preset.
After an interruption or power loss
After an unplanned interruption, the status that was last visible on screen is not a durable record by itself. What matters is the most recently saved, coherent output/map pair on disk. Closing and verifying the job means confirming that saved pair is consistent — it does not mean rereading the original source again to "double-check," which reintroduces the exact risk the acquisition was meant to avoid.
File-priority acquisition is optional, not a mandatory first pass
Where metadata is already available and intact, acquiring specific files or extents before the rest of the device can be a reasonable, supported technique for prioritizing high-value data on an unstable source. It is an optional technique available in some tools and workflows, not a required first pass, and it does not substitute for a coherent map of the ranges that were and weren't covered. This page is about the operational acquisition plan itself; the retry, timeout and error-handling mechanics that a tool applies during a single read are covered in Read Errors, Timeouts and Retries, and head-aware techniques specific to mechanical hard drives are covered in Imaging Bad Sectors on an Unstable HDD.
The four training scenarios below work through specific acquisition situations in more detail.
Training scenario: a readable HDD with one localized slow zone
Most of the drive images quickly; one region reads very slowly but does eventually return data.
A localized slow zone can still allow a first-coverage strategy, as long as the device's identity and behavior stay stable and controllable; fast reads elsewhere do not by themselves establish that the drive is stable, and this observation alone doesn't establish what's causing the slow zone.
Let the first pass skip past the slow zone to finish easy coverage, then return to the slow region with a scoped, limited retry strategy.
Check the final map for that region specifically, rather than assuming the overall pass summary covers it adequately.
Training scenario: a reconnect changes the device's reported order
The source disconnects and reconnects during acquisition; afterward, the operating system assigns it a different device letter or path than before.
A changed device letter does not by itself confirm or rule out that this is still the same physical source.
Before resuming, match the source by its own identifiers — not by device letter — and confirm the output and map still correspond to that same source and scope.
Only resume once the source identifier, output and map are all confirmed to agree; otherwise treat it as a new acquisition.
Training scenario: capacity changes and disconnects worsen over the session
Reported capacity shifts between sessions, and disconnects become more frequent as the acquisition continues.
This pattern suggests a deteriorating access path or device, not a situation where more scanning will resolve itself.
Stop; do not run a full scan or aggressive retries against a source that is behaving this way. Preserve what has already been captured and move to assessment.
Confirm the closed acquisition's map honestly reflects a partial, not complete, result before any further analysis relies on it.
Training scenario: the destination write fails partway through
The acquisition reports errors partway through a session; the destination drive, not the source, turns out to be full or faulting.
A destination-side fault can look similar to a source read failure in a summary log; the two need to be told apart before drawing conclusions about the source.
Fix or replace the destination. If the destination is replaced, first transfer the preserved partial output together with its corresponding map onto the new destination — never apply an old, successful map to a blank replacement output. Resume only once a coherent output/map pair exists on the new destination, not automatically after any write failure.
Check the durable output and map together using the acquisition tool's documented recovery procedure. Do not mark ranges as successfully acquired unless their corresponding output is present and validated. Preserve the earlier map and logs before any supported correction or restart.
Technical references: GNU ddrescue manual and the author's manpage, as packaged by Debian — mapfile concept, resume behavior, and the timeout-since-last-successful-read semantics referenced above; exact switches and default behavior can vary by version, so confirm them against the documentation for the version actually in use. Vendor- and model-specific mechanical diagnostics are outside the scope of this page; consult official, model-specific documentation before relying on any such detail.
Related: Read Errors, Timeouts and Retries Explained · Imaging Bad Sectors on an Unstable HDD · Disk Imaging vs. Cloning · What a Disk Image Preserves — and What It Does Not · Recovery Copies: Roles, Dependencies and Rollback · Disk Imaging & Cloning Tools · Hardware Imagers & Recovery Rigs