RAID Reconstruction Basics
RAID reconstruction builds a virtual block address space from the members that are actually available, then checks whether the filesystem and files above it agree with that address space — it is not the same thing as returning files, and it is not the same thing as a controller rebuild. Which parameters matter depends on the level: mirroring needs to know which copy is current, striping needs member order and chunk size, and parity layouts add rotation on top of that. Software reconstruction can normally assemble a candidate virtually and check it before anything is written, which is the main reason to prefer it over an in-place rebuild when the array's state is uncertain.
- Reconstruction builds the array's virtual address space; it isn't the same as a controller rebuild.
- Identify every original member, replacement and spare, and preserve their history first.
- Geometry and member state are separate questions; settle both before trusting a candidate.
- Build candidates virtually on member images, never on the only copies of the disks.
- Validate across several regions and large files before extracting or considering repair.
Scroll horizontally to see the full diagram →
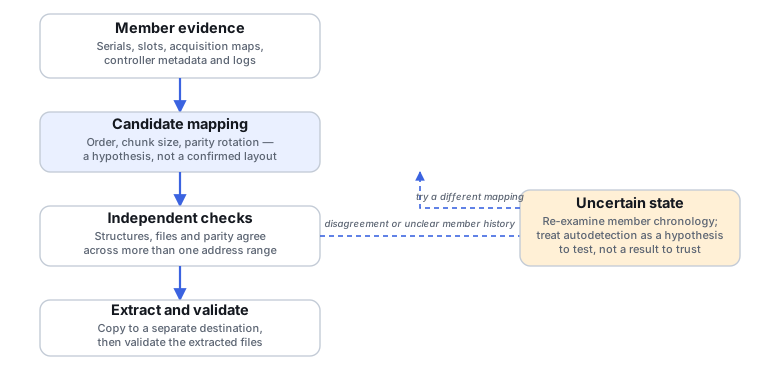
What reconstruction actually reconstructs
Reconstruction builds the array's virtual block address space from its members, and only after that does whatever filesystem sat on top of the array become visible. Getting a volume to mount is a checkpoint, not the goal: the actual goal is a correct address space, confirmed widely enough that the files extracted from it can be trusted. A rebuild is a different, write-capable operation — it writes calculated data back into a live array. Recovery software can usually assemble a candidate array virtually, from preserved sources, and check it before anything is rebuilt or written.
Preserve the member set and its history
Before anything else, identify every original member, replacement disk, hot spare, and any disk that may have been removed earlier in the array's life. Record serial numbers and slot positions, acquisition images or clones of each member, and whatever controller metadata, configuration and logs are available. A slot number (see the Linux kernel's software-RAID (md) device documentation on member roles and device state) is a hint about a disk's role, not proof of it — metadata, data patterns and logs may still be needed to confirm which position a given disk actually occupied. Exact state names and attributes are specific to the implementation in use; check the documentation for the controller, appliance or software actually involved before relying on any one vendor's terms.
Geometry and member state are separate questions
Geometry is level, member order, chunk size versus full stripe width, data offsets, parity rotation, and any nested-array layout on top of that; some controllers or NAS appliances add their own metadata or transformations as well. Chunk size is the amount of data written to one member before moving to the next; full stripe width is that chunk size multiplied by the number of members actually carrying data, not the total member count — the two get conflated easily, and a parity layout adds a further distinction between the data width (members carrying data) and the width including parity (all members), which are different numbers and both matter. Member state is a different question: a disk can be physically healthy and still be logically stale if it left the array before later writes occurred, and it can be absent, unreadable, or only partially rebuilt. Treating a stale member as current is often worse than treating it as missing, because its sectors look valid while actually representing an earlier generation of the array. Record which member failed or was removed first, which disk replaced it, whether a rebuild started or completed, and whether the array stayed writable while degraded — a replacement disk, a partially rebuilt member and the original failed member can each hold a different version of the same stripes, and treating every detected disk as equivalent is not safe.
Scroll horizontally to see the full table →
| Level | What must be reconstructed | Missing-member tolerance | Notes |
|---|---|---|---|
| RAID 0 | Member order and chunk size; there is no redundancy to fall back on | None for the stripe set as a whole — a missing or stale member leaves gaps across every stripe it touched | Striping distributes data across members; a single absent or wrong-generation member affects every stripe, though files or extents that happen to fall entirely within still-present, still-current chunks may remain partially readable, and a stale member is not the same as one with damaged sectors |
| RAID 1 | Which mirror copy is current | One or more surviving, current copies, depending on how many mirrors existed | Any up-to-date copy can serve as the source; a stale copy is the actual risk, not a missing one |
| RAID 5 | Member order, chunk size, and parity rotation | At most one missing or unreadable member, and only when the remaining members are a consistent set | Parity can reconstruct one absent member algebraically — it does not by itself confirm the surviving data is current |
| RAID 6 | Member order, chunk size, and dual parity placement | Up to two missing or unreadable members, under the same consistency condition as RAID 5 | A second parity set adds tolerance; it is not proof the surviving members agree on generation |
| RAID 10 (conventional striped mirror pairs) | Which mirrored pair each stripe belongs to, and which side of each pair is current | Depends on which specific disks are affected: losing both sides of one mirrored pair is generally unrecoverable at this level, losing one disk from each of several pairs generally is not | Availability here is about which disks are missing, not how many — disk count alone does not determine the outcome. This row describes the conventional striped-mirror-pairs layout specifically; other RAID 10 implementations, such as Linux MD's near, far, and offset layouts, distribute data differently and need their own model — confirm which layout is actually in use before applying this row. |
Tolerance in this table describes which configurations of missing or stale members still permit a fully consistent candidate under that level's own redundancy math. It is not a success guarantee, and it is not a rule for everything else either: partial salvage of individual files or extents can sometimes still be possible in configurations that fall outside full redundancy coverage, just as it can still fail within it.
Build a candidate virtually, on preserved sources
Work from preserved member images or clones, not from the only copies of the members themselves. Importing a foreign configuration, force-assembling, or rebuilding directly onto the only available member set removes the ability to try a different candidate if the first assumption turns out wrong. Treat automatic detection of array parameters as a hypothesis to test against the data, not as a result to trust on its own.
Illustrative example: a replacement disk after an interrupted rebuild
A disk that replaced a failed member during an interrupted rebuild is detected and reads without errors.
Readable is not the same as current. The replacement likely holds correct data only for the address ranges the rebuild had actually reached before it stopped — the rest may be unwritten or partially written.
Do not treat the replacement as fully current by default. Establish how far the rebuild progressed, and build a candidate that accounts for a region boundary within that single disk.
Check filesystem structures and known files on both sides of the suspected boundary, not only near the start of the array.
Illustrative example: a wrong chunk size looks fine at first
A candidate assembled with one chunk-size guess mounts, and the root directory listing looks correct.
A wrong chunk size can still produce a readable directory structure near the start of the array while corrupting the content of larger files that span many stripes.
Do not accept the candidate on the strength of a mountable volume alone. Open and check representative large files, not just the directory tree.
Compare results from more than one chunk-size candidate if the first large file fails to open or decode correctly.
Validate across the address space
Check a candidate at more than one location: expected partition and volume structures, coherent filesystem metadata, directory trees, and representative files, including large files that span many stripes and files from different regions and time periods. A successful mount or a readable directory near the beginning of the array does not by itself prove member order or parity geometry are correct. Where parity applies, agreement between data and parity is evidence the candidate is self-consistent — it is not proof the underlying data is current, since a stale but internally consistent stripe can still satisfy parity.
Extract and validate before considering repair
Once a candidate has held up against checks across more than one region, copy the needed data to a separate destination and validate what was extracted. A physical rebuild, if one is still wanted, is a separate maintenance decision to make afterward, once the recoverable state is actually understood — not a shortcut to take instead of validation.
Reconstruction answers the question "how were these members actually combined?" A rebuild writes calculated data back into a live array based on an assumed answer. In an uncertain case, answer the first question on a preserved copy before doing the second to the original members.
This page covers RAID as one storage layer among several. A RAID volume that reconstructs cleanly can still sit under a damaged filesystem, a NAS management layer, or a SAN presentation layer that needs its own separate treatment — see the related NAS and SAN pages below for those layers specifically. A healthy SMART report on an individual member says something about that disk's own self-reported condition; it is not evidence about that member's logical state within the array.
What should you check next, in order?
Answer a short sequence of questions about the current state of your array. Each result points to the safer next step, not a diagnosis of the array or an automatic repair.
This guide also works without JavaScript. The same sequence, as a static walkthrough:
Is access to the RAID members you need currently stable?
- Yes → continue to the next question.
- No or not sure → Outcome: Reassess the acquisition before going further. Reconstruction depends on reading the members you still have without making their state worse; unstable or worsening access is an acquisition problem to resolve first. See Preserve the member set and its history, and How to Image a Failing Drive Safely and When Software Recovery Is No Longer Appropriate. Stop if a member shows new mechanical symptoms or rapidly worsening access.
Do you have preserved copies and documented history for each member (original, replacement, spare or removed, and when)?
- Yes → continue to the next question.
- No or not sure → Outcome: Preserve copies and document member history before anything else. Candidate mapping and validation both depend on knowing which disk played which role and when. See Preserve the member set and its history, and RAID Metadata, Member State and Foreign Configurations and Recovery Copies.
Was there an interrupted or partial rebuild, or might members represent different points in time?
- No → continue to the next question.
- Yes or not sure → Outcome: Establish member chronology before building a candidate. A member that left the array before later writes occurred represents an earlier generation even if it reads perfectly. See Geometry and member state are separate questions, and Recovering After an Interrupted RAID Rebuild and Storage Metadata Generations and Consistency.
Has the candidate mapping been checked against filesystem structures and files in more than one region of the address space?
- Yes → Outcome: Extract to a separate destination, then validate the extracted files. See Extract and validate before considering repair, and Recovery Copies and How to Validate Recovered Data. Stop and re-check if extraction turns up new errors or inconsistencies.
- No or not sure → Outcome: Validate the candidate mapping across more than one region before extracting anything. A mountable volume or a readable directory near the start of the array is not enough on its own. See Validate across the address space and How to Validate Recovered Data.
This guide suggests a next step from the information you provide. It does not diagnose hardware condition, estimate a percentage chance of recovery, or confirm that what you entered is accurate.
Technical references: Linux kernel: software RAID (md) — member slot, role and state · md(4) manual page — superblock formats; RAID10 near/far/offset layouts · mdadm(8) manual page — --examine metadata; forced assembly risks
Related: Sparse, Thin-Provisioned and Virtual Storage Recovery · Data Recovery Workflow · RAID Array Failure · Failed RAID Rebuild · NAS Failure · Hex Editors & Disk Structure Viewers · Drive Cages & RAID Enclosures · RAID Metadata, Member State and Foreign Configurations · Recovering After an Interrupted RAID Rebuild · Reconstructing NAS Storage Stacks · Storage Metadata Generations and Consistency · RAID, NAS and SAN Reconstruction Tools.